Build Your Own Clone Message Board

It is currently Wed May 15, 2024 10:03 pm

All times are UTC - 6 hours


Post new topic Reply to topic  [ 17 posts ] 
Author Message
PostPosted: Sun Jul 02, 2006 6:17 am 
Offline

Joined: Sun Jul 02, 2006 6:11 am
Posts: 29
I have a Screamer kit, but it needs... something beyond the gain, tone, volume...

Image

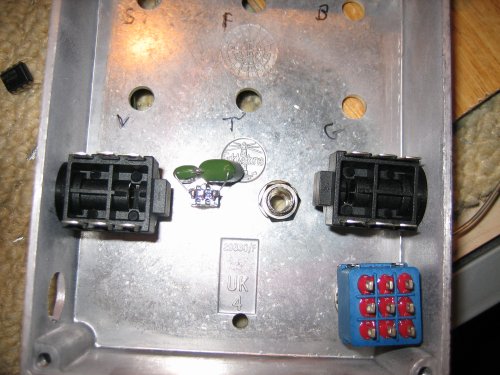
That looks promising. I never use batteries, but it made sense to leave space, and it'll have a metal clip to hold it in place which'll be rivetted into position. I suppose the various parts should actually be on the inside but that's easily rectified later. I'm not using the BYOC jack sockets because I prefer the enclosed type. Next step, measure up, put on some masking tape and mark the positions of the holes:

Image

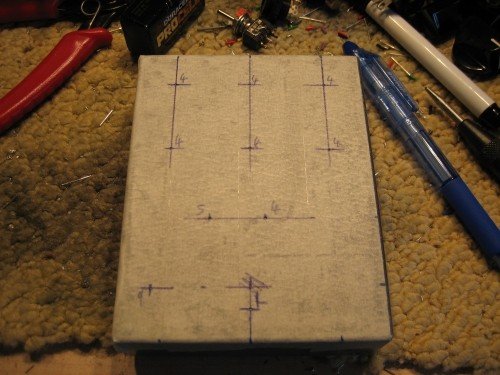
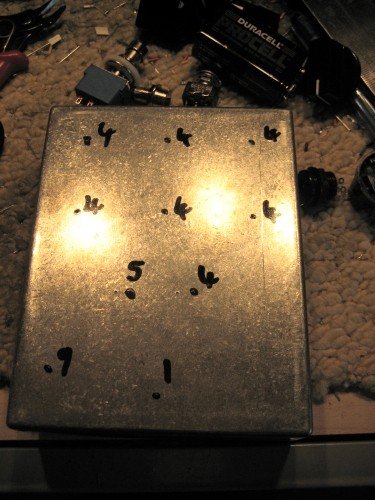
Okey. I punched the centres of the holes through the tape, then removed it (it gums up the bit and leaves a residue if you drill through it). Marked the holes with a dry-wipe marker (permanent pen can leech through the paint), including how many steps each hole will take on the stepped drill-bit.

Image

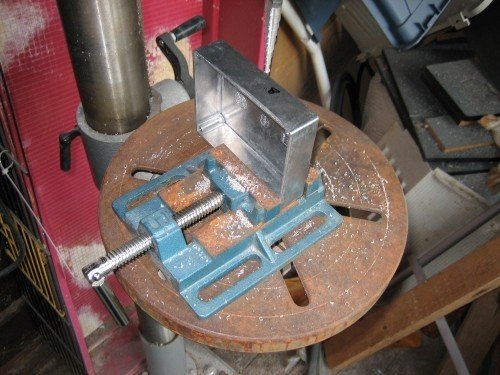
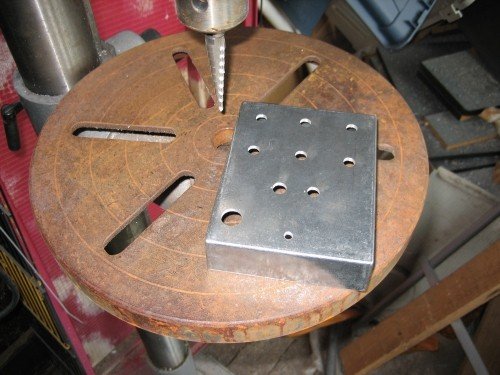
Drilling. Sides first - note the drill vice. Don't want to snag the bit and lose a wrist. The drill table is a bit rusty as you can see - I really need to ix the shed roof!

Image

Skip a bit. I got fed up with drilling and just used a machine-gun on the other holes. Turned out better than I'd expected.

Image

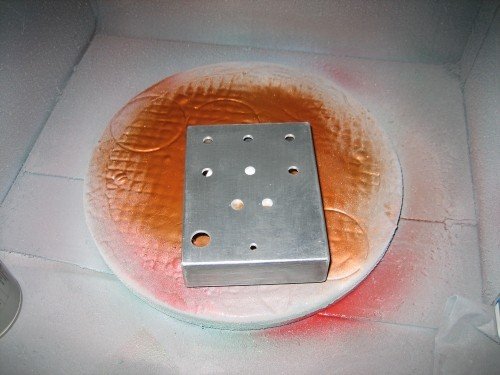
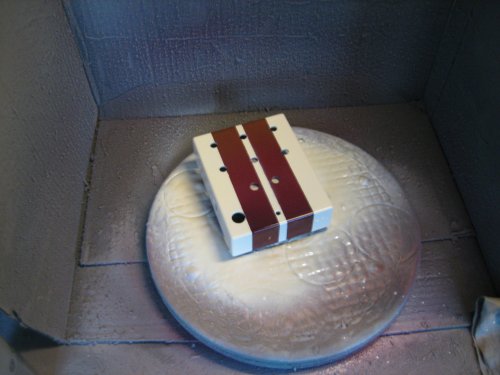
Sanded the enclosure so the paint would grip properly, then degreased with isopropanol and wiped clean with kitchen paper. Note the high-tech spray booth - two thirds of a cardboard box, a cake turntable and the lid from a spraycan to hold the enclosure above the turntable - this prevents it getting "glued" on with the paint. So many painful lessons learnt...

Image

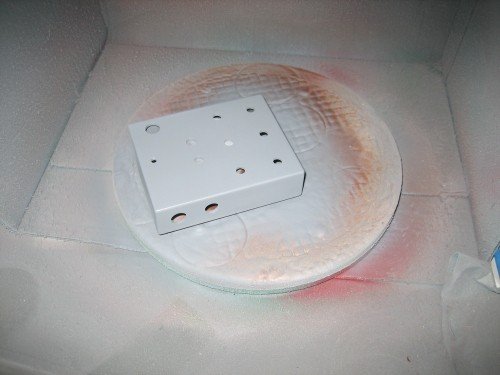
And some primer. Two coats, because, erm, that's how many I always do.

Image

I'm going with two big fat stripes.

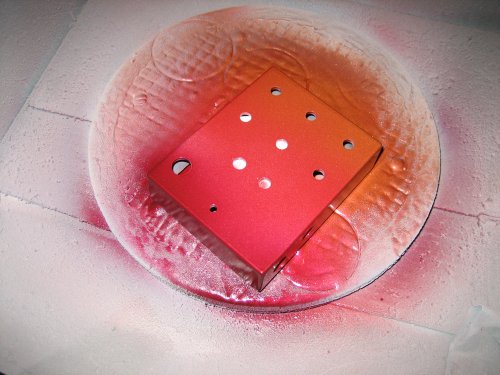
Here's the basecoat paint - this'll form the stripes tomorrow. One coat of colour, two of lacquer. The lacquer's gone on really nicely - this should look like it's been dipped in glass. I think it's Ford Aztec Bronze, Nissan something or other and Daewoo Ruby Red. The main colour will be white, I think. Something classy (for a change).

Image

I didn't get a picture with the masking tape on; I wanted to leave it there as short a time as possible. Two strips, then a quick blast of white and ivory paint (thought it'd look a bit "aged" but there's not much contrast), then off comes the tape, quick as possible. The tape did fray a little at the edges unfortunately, but it looks passable.

Image

Next step is to put on a LOT of lacquer in several coats. I want to remove any apparent border between the two sets of paint.

Day Two!

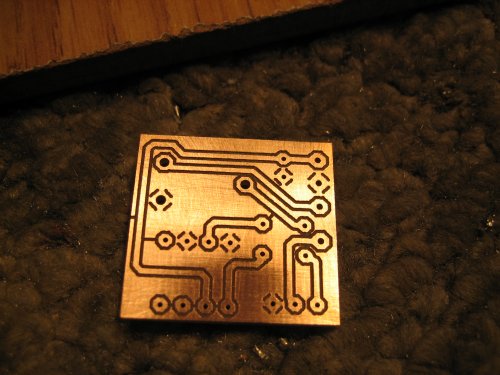
First job today was to make up the board for the booster. It's a basic 386-N4 based dealie; 10uF power decoupling cap, 0.1uF input and output caps, 470k trimpot on the input - I want the end result to be usable as a clean boost, and without padding the input I know some of my guitars will clip the 386.

Here's the board as it came off the CNC router - design took about 40 minutes.

Image

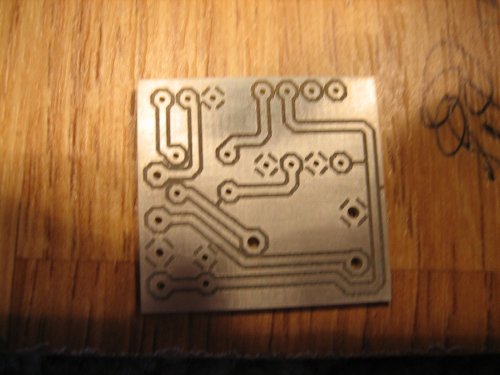
Then into the tinning tank for 20 minutes.

Image

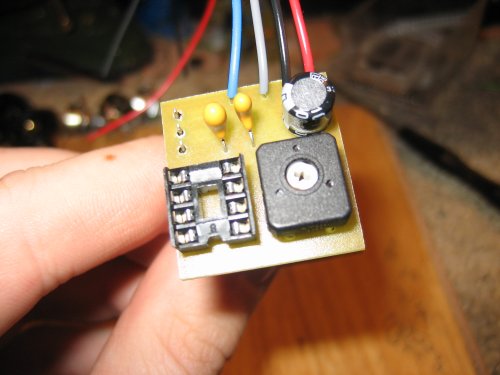
And populated - originally I wanted to mount it onto a pot, but in the end it's on shortish flying leads.

Image

Next up is the midboost switch. Just a simple SPDT doodah that switches between the two caps supplied in the kit.

Image

I'll skip the tedious detail of populating the BYOC board - I socketed the diode slots so I could experiment a little (currently a 3mm orange LED and two 914s), and changed out the carbon resistors for metal films wherever I had the right values.

On to the assembly - took 2-3 hours.

Image

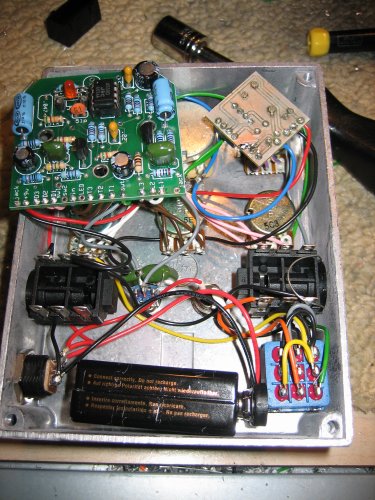
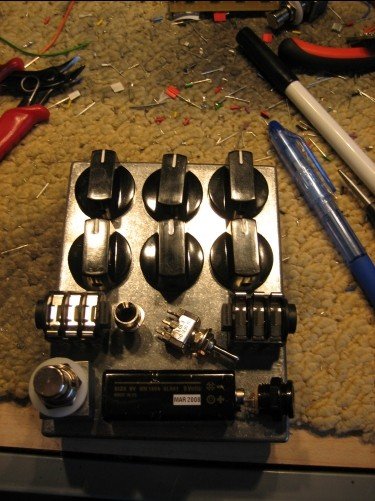
You can see the bigger pot in the middle - it's a Fender no-load tone pot for the feedback loop. When turned up to full it disconnects the wiper from the far end lug. The downside is that it then turns "backwards" - fully clockwise is no feedback, fully counterclockwise is 100% feedback.

Had a bit of difficulty with the booster board - just some cack-handed soldering. Finally got it all working though, and it is magnificent.

Image

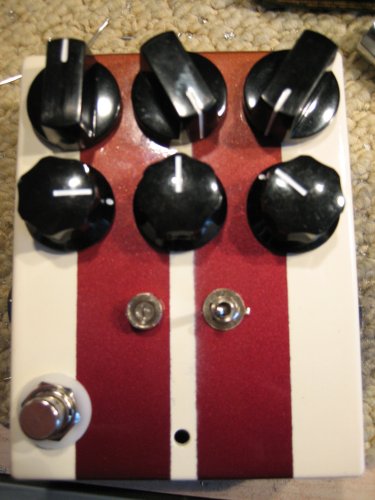
The knobs are, left to right, top row first, booster, feedback, power supply sag (for the screamer board only). Lower row is for the screamer - Drive, Tone, Volume.

There's a lovely range of sounds - clean boost, mild breakup, crunch, BREWTAL GAIN distortion, huge thick fuzz sounds, thin spluttery fuzzes, zippery glitchy fuzzes, howling feedback and much more.

I am very, very pleased. The insides could be neater but that's no real problem. Just need to rivet the battery clip in and it'll be complete. Ace. The boost knob is backwards too, so I'll reverse the wires at some point, and the sag control - currently 47k - could do with being a lower value as the action is all in the first little bit of the turn. I'll swap for a 4.7k pot.


Top
 Profile  
 
 Post subject:
PostPosted: Sun Jul 02, 2006 10:48 am 
Offline

Joined: Thu Jun 08, 2006 10:38 pm
Posts: 568
Holy #%@& that's amazing!

P.S. how do you go about making a feedback switch?

_________________
Pfft, what kind of loser takes the time to make a signature?


Top
 Profile  
 
 Post subject:
PostPosted: Sun Jul 02, 2006 11:12 am 
Offline
Site Admin
User avatar

Joined: Sun Jan 22, 2006 1:39 pm
Posts: 5998
Location: Richland, WA
Hey Andy,

Welcome! Nice work as always. I'm sure people would love to see that delay you did too.

_________________
*patience is a virtue*

Please do not PM me. email is prefered. keith@buildyourownclone.com


Top
 Profile  
 
 Post subject:
PostPosted: Sun Jul 02, 2006 1:00 pm 
Offline

Joined: Sun Jul 02, 2006 6:11 am
Posts: 29
Quoteman wrote:
Holy #%@& that's amazing!

P.S. how do you go about making a feedback switch?


Thanks!

The feedback thing is just a 250k pot with the PCB's input connected to one outer lug and the PCB's output to the wiper.

I lost the delay pictures in a recent webhost naff-up, so I'll have to see where they are or redo them, but post them I shall. I love these kits. I know I have everything I need to make pretty much any pedal, but the boards are beautifully made, all the components are there and you know they'll work if you hook 'em up right. :)


Top
 Profile  
 
 Post subject:
PostPosted: Sun Jul 02, 2006 2:36 pm 
Offline
User avatar

Joined: Thu May 04, 2006 7:28 pm
Posts: 552
Location: Nova Scotia, Canada
Thats awesome! Love to hear some clips.


Top
 Profile  
 
 Post subject:
PostPosted: Sun Jul 02, 2006 3:29 pm 
Offline

Joined: Sun Jul 02, 2006 6:11 am
Posts: 29
I was afraid someone would say that. ;)

I'll have a go, but it's hard to know where to start - it seems to do all flavours of dirt.


Top
 Profile  
 
 Post subject:
PostPosted: Sun Jul 02, 2006 11:52 pm 
Offline
Site Admin
User avatar

Joined: Sun Jan 22, 2006 1:39 pm
Posts: 5998
Location: Richland, WA
You have a CNC machine? What that set you back? I've been gassing for one like it was a 52 tele.

_________________
*patience is a virtue*

Please do not PM me. email is prefered. keith@buildyourownclone.com


Top
 Profile  
 
 Post subject:
PostPosted: Mon Jul 03, 2006 1:22 am 
Offline

Joined: Sun Jul 02, 2006 6:11 am
Posts: 29
Mine was about £7k including a full toolset, isolation cabinet, software and vacuum extractor. Not the cheapest you can buy by a fair bit, but it has a proper stepped z-axis (not a solenoid like on some, which tend to break router bits) and a built-in Windows Black Box.

It's this one (I have proper pictures somewhere, but they fell off the last webhost when their shoddy server fell over):

Image


Top
 Profile  
 
 Post subject:
PostPosted: Mon Jul 03, 2006 5:19 pm 
Offline
User avatar

Joined: Tue Jun 06, 2006 7:27 am
Posts: 65
Location: Down By The Seaside
Bravo... what a cool thread. Nice job, thanks for sharing. What about more info on the tinning process of the board. Is that hard? I haven't a clue how this stuff is done, but I'd sure love to learn.

<side point>Last year I went to a Fender workshop thing at a guitar store where a couple of the main builders (I forget their names - the guy who did the SRV strat) came and explained their techniques for creating their relic series. They showed us the under side of the pickguard and it had a ring from overspray where it had sat on a paint can. They said of course, current Fenders don't get that problem, but it was kinda cool that they replicated the 'ring'.

_________________
Leaves are falling all around, time I was on my way..


Top
 Profile  
 
 Post subject:
PostPosted: Mon Jul 03, 2006 9:52 pm 
Offline
Site Admin
User avatar

Joined: Sun Jan 22, 2006 1:39 pm
Posts: 5998
Location: Richland, WA
Andi wrote:
Mine was about £7k including a full toolset, isolation cabinet, software and vacuum extractor. Not the cheapest you can buy by a fair bit, but it has a proper stepped z-axis (not a solenoid like on some, which tend to break router bits) and a built-in Windows Black Box.

It's this one (I have proper pictures somewhere, but they fell off the last webhost when their shoddy server fell over):

Image


sweet. I need one of those.

_________________
*patience is a virtue*

Please do not PM me. email is prefered. keith@buildyourownclone.com


Top
 Profile  
 
 Post subject:
PostPosted: Tue Jul 04, 2006 1:40 am 
Offline

Joined: Sun Jul 02, 2006 6:11 am
Posts: 29
FretShock wrote:
What about more info on the tinning process of the board. Is that hard? I haven't a clue how this stuff is done, but I'd sure love to learn.


The tinning is trivially easy - and very cheap.

You need some of this:

Image

either the solution or the powder. The powder gets dissolved in 50-60C water (ie straight out of the hot tap in your house). That goes into one of these:

Image

No heater - the tinning solution works at room temperature, no spray or bubble unit, just a tank with a lid - you can use a Tupperware box instead and it'll work just fine.

Just scrub the PCB with wire wool or a scrub block until it's pink and shiny, then dump it in the solution. After about 10 seconds it'll look silvery, but I leave it in about 20 minutes to get a thicker tin layer. Then it'll never tarnish and it takes solder far more easily. Plus it looks cool. Take it out of the tank with plastic or wooden tongs (I use a wooden clothes peg - high tech stuff) as metal can react with the tinning solution, then rinse it under cold water to get the excess solution off, then under hot water to remove any unplated crystal, then dry. The whole process takes under half an hour, and you're only actually doing anything for about 5 minutes of that. Well worth getting.

The CNC machine has been a great purchase. At the rate I sell pedals it'll take about 10 years to pay off in purely financial terms, but it just saves so much time and hassle - I have absolute control over the boards, and they are totally consistent. Plus I've used it to make up drilling templates - a lot of my pedals have the same control layout and/or jack socket layout, so I made up copper blanks with holes in that I can use a centre-punch through to mark them up. Now instead of taking 5-10 minutes with a ruler and scribe I can have the boxes punched in about 20 seconds each, and it's accurate. Next thing to try is to do PCBs that attach to the 3PDT switches. Well, that and doing a double-sided board.


Top
 Profile  
 
 Post subject:
PostPosted: Tue Jul 04, 2006 10:15 am 
Offline

Joined: Thu Feb 23, 2006 3:45 pm
Posts: 1151
do you sell pedals for a lving or something? do you have a website?

_________________
safe? who said anything about safe? of course He isn't safe! but He's good. He's the king i tell you!


Top
 Profile  
 
 Post subject:
PostPosted: Tue Jul 04, 2006 10:24 am 
Offline

Joined: Sun Jul 02, 2006 6:11 am
Posts: 29
Not for a living - my day job is as an AV designer - I design the technology bits for corporate boardrooms and presentation suites and so on. The pedals bring in a bit of pocket-money and give me something to do of an evening or weekend.

I'm not sure if I'm allowed to post a link to my site here - Keith?


Top
 Profile  
 
 Post subject:
PostPosted: Tue Jul 04, 2006 10:36 am 
Offline

Joined: Mon Apr 03, 2006 9:24 am
Posts: 31
Location: United Kingdom
So you did a degree in electronics?? or something along those lines?


I have ordered from you in the past and you do a top job.

Also would you be up for doing a pcb for me

Aj


Top
 Profile  
 
 Post subject:
PostPosted: Tue Jul 04, 2006 11:31 am 
Offline
Site Admin
User avatar

Joined: Sun Jan 22, 2006 1:39 pm
Posts: 5998
Location: Richland, WA
Andi wrote:
I'm not sure if I'm allowed to post a link to my site here - Keith?


Absolutely. Go ahead. I'd have done it for you, but the logical URL brings up a page that says, "hosting for this account has expired".


Just for the record, if anyone wants to link to their "commercial" sites, I do not mind. Most of the people here are already hooked on DIY, so the potential for generating revenue from spam on this BB is low. I know it's more just to show off what you are doing.

Furthermore, if this BB grew to the point were people think that they'll get business by spamming here, I would consider it a compliment....unless they were selling FX kits....then I might boot them.

_________________
*patience is a virtue*

Please do not PM me. email is prefered. keith@buildyourownclone.com


Top
 Profile  
 
 Post subject:
PostPosted: Tue Jul 04, 2006 12:18 pm 
Offline

Joined: Sun Jul 02, 2006 6:11 am
Posts: 29
I did a 4-year Master's degree in Electronic Engineering and Music Technology Systems at York uni. I don't generally make PCBs for other people because of the nature of the router - it needs a Gerber file or an EAGLE file and can't work straight from artwork. I've PM'd you details of someone who might be able to help though.

My site is http://www.monkeyfx.co.uk - the .com version was taken by an Australian (I think) squatter and I couldn't be bothered to ask what he wanted for it.

Keith - kits are waaaaay beyond my abilities - I am no organiser! I work on a few projects at a time and that's enough for me. I've no great desire to make pedals full-time - it's nice at the moment that I can take a break over each Christmas and similar.


Top
 Profile  
 
 Post subject:
PostPosted: Thu Jul 06, 2006 7:46 pm 
Offline

Joined: Thu Jun 08, 2006 10:38 pm
Posts: 568
sound clips please...

_________________
Pfft, what kind of loser takes the time to make a signature?


Top
 Profile  
 
Display posts from previous:  Sort by  
Post new topic Reply to topic  [ 17 posts ] 

All times are UTC - 6 hours


Who is online

Users browsing this forum: No registered users and 2 guests


You cannot post new topics in this forum
You cannot reply to topics in this forum
You cannot edit your posts in this forum
You cannot delete your posts in this forum
You cannot post attachments in this forum

Search for:
Jump to:  
Powered by phpBB® Forum Software © phpBB Group